Showing posts with label picture. Show all posts

Monday, 9 December 2013

Durham Lumière Festival 2013


I'm currently working some extra shifts for Christmas and it is difficult to keep posting regularly. I don't know how other bloggers manage to keep up so well. So, I'm a bit late with the post on Durham Lumière, which was at the end of November (14 -17 Nov.), but I made sure, that you would get the best pictures from it! Here you are, I hope you enjoy it.

Durham Lumière is an amazing event, organised by the outdoor event planner Artichoke, it occurs every two years. During the festival time, the city is transformed into a magical place using interesting lighting to illuminate Durham's buildings, streets and public spaces.

Durham Lumière 2011 had some impressive art works (the waterfall bridge, the monument that was transformed into a huge snowball globe, the heavenly installation inside the cathedral, the fire alchemy in the cloister garden), so the expectations were high. 

I have to admit that this year's Durham Lumière wasn't quite as impressive, but it did have some spectacular and magical installations.

My journey started in the marketplace. I was expecting something monumental as this is the city centre; I was left searching for a hidden treasure in this crowded place. I finally found it - a phone box, transformed into an aquarium, off the beaten path. 


Due to a large crowd, I waited patiently for my turn to view it up-close; the phone box had been turned into a lit aquarium with colourful swimming fish.  An exotic little world, a quirky living universe at the heart of Durham. 
Looking at it, made me dream of the crystal blue water on a tropical island. The goldfish reminded me of quirky images I've seen in movies - a girl bringing home a goldfish in a plastic back, which she had won at the funfair, or a lonesome little goldfish, swimming in one of those tiny, empty fish bowls.


The next thing that grabbed my attention, was some colourful street decoration which turned out (upon closer inspection) to be made of lots of plastic bags. It irritated me that something I would normaly associate with pollution, could create such a happy atmosphere. 
I continued to walk down the beautifully decorated Durham shopping mile, which lead me directly to an unconventional Christmas tree...


To see this beautiful Christmas tree was certainly a surprise. As far as I am aware the artist wanted to make us visitors aware of the pollution of our environment, but this was quite a different picture from the growing piles of rubbish away from our everyday view. It illuminated the place with colours of yellow, orange, blue, white and green. Even the children were fascinated by it, and were drawn back to have a closer look.


One of the highlights was the lightshow "Crown of Lights" at Durham cathedral itself. The cathedral is one of my favourite places, but seeing it illuminated in such bright and clear colours, was amazing and breathtaking. 
The light show retold the history of Christianity in the North East with images of the ancient book, the Lindisfarm Gospel. Images of the attacks and destruction of holy island by the Vikings, an all-exciting fire, and the re-building of the cloister were only some of the powerful images displayed on these ancient walls. No words, just music, and pictures.

If you would like to view a more vivid interpretation of how the Vikings attacked the holy island with the Lindisfarne priory, watch the television series "The Vikings" - S1E2, it's quite the eye opener.

Another pleasurable experience was at the sanctuary, several neon bird boxes were hidden in the trees at the old graveyard of St. Oswald church, accompanied by the soundtrack of bird calls. It seemed rather creepy to me, standing in the middle of some old stone tombs, and hearing the voices of ravens, but the sound began to turn into morning bird song and I felt reminded of spring. Strangely enough my body reacted with a tickling nose and several sneezes. It was definitely a magical place, where I would have loved to resided longer.


This installation showed a model of the sun on a more approachable scale. A huge helium balloon was flying in an open space between the university buildings, changing colour to simulate the turbulence of the sun's surface, accompanied by a growling background noise.
I took several pictures of the balloon itself and its changing surface, but it could not truly catch the atmosphere and do it justice. Finally I decided to take a picture of its mirror image in one of the university building windows. Maybe we are used to see the moon, looking outside the window, but certainly not a view of the sun in this size so close.


Like in a scene from Jurassic Park, where the protagonists could feel the Tyrannosaurus Rex approaching them by the rhythmic stamping of its heavy footsteps (depicted through ripples of water in a glass), you could hear the heavy footsteps of this elephant hundreds meter away.
The sight was mesmerizing. The elephant looked real and its movements were natural. It looked like it was trapped within a huge canvas, and made me wants to get closer and console him by feeding him some vegetables. I couldn't help but feel a sudden urge to visit a zoo. 


Just like last time, I was lucky to visit Durham Lumière twice. Once to check out the initial big attractions, and a second time to enjoy my favourite ones again. I hope that Artichoke and Durham Council will continue this successful partnership and I'm looking forward to Durham Lumiere 2015. 

Sunday, 29 September 2013

Tutorial for a DADA Sound Poem


The following idea is based on an exercise by my former Art teacher Mr. Rose in college.
I had so much fun when doing it and learned so much on DADA and Art history, that I want it to share with you. 

I love love love DADA! It's a source of inspiration for me, because of its multi media use, its nonsense and absurdity.

I don't know how popular DADA is, so I guess I’ll just start with a short introduction.

DADA was an art movement in the early 20th century of the European avant-garde. It started probably in Zürich around 1915 and then spread to Berlin, New York and other cities. Artists protested against the First World War and the bourgeois culture with provocation and satirical nonsense. DADA inspired Collage, Photomontage, Assemblage, Ready Mades and Sound poetry. Famous artists involved where Max Ernst, Salvador Dali, Hans Arp, Marcel Duchamp and Kurt Schwitters.

Sound poetry uses the phonetic aspects’ of human speech.
 In times of DADA it was often part of a public performance. Here is a famous poem by DADAist Hugo Ball:

Karawane
jolifanto bambla ô falli bambla
grossiga m'pfa habla horem
égiga goramen
higo bloiko russula huju
h`ollaka hollala
anlogo bung
blago bung
bosso fataka
ü üü ü
schampa wulla wussa ólobo
hej tatta gôrem
eschige zunbada
wulubu ssubudu uluw ssubudu
tumba ba- umf
kusagauma
ba- umf

If you are brave enough, print out the sound poem "Karawane", position yourself in the middle of your living room; maybe with a few unlucky spectators and read the poem out loud ... have fun!


You should now have an idea of sound poetry and maybe even had a go at it. Now how about making your own sound poem...


What you will need:
- Different magazines
- Scissors
- Cardboard or drawing paper
- Glue


  • Get some magazines and start cutting out different headlines. The letters should be 1/3 cm high (0.4-1.2 inches). If you have different magazines, you have a better chance of getting words in different typography and colours, which will make the visual later more interesting


  • Get a good pile of words. Cut out the words into different letters and sort them into the alphabet. A few letters each is enough, otherwise it becomes an exercise in OCD. 


  • Get the cardboard, scissors and some glue and get started imagining some new words. A sound poem is an acoustic experience. It helps using lots of vowels and nice sounding letters like R, K, P, S and Z.


  • And Voilà. You can frame your work for display – and remember to rehearse in case someone asks what it is.


Wednesday, 11 September 2013

Tutorial for a Tipi Triangle Picture


I'm currently painting pictures to decorate our house. While I was doing the Triangle Picture, I thought, it could be an interesting thing to share. I hope it inspires you! :)

What you will need:

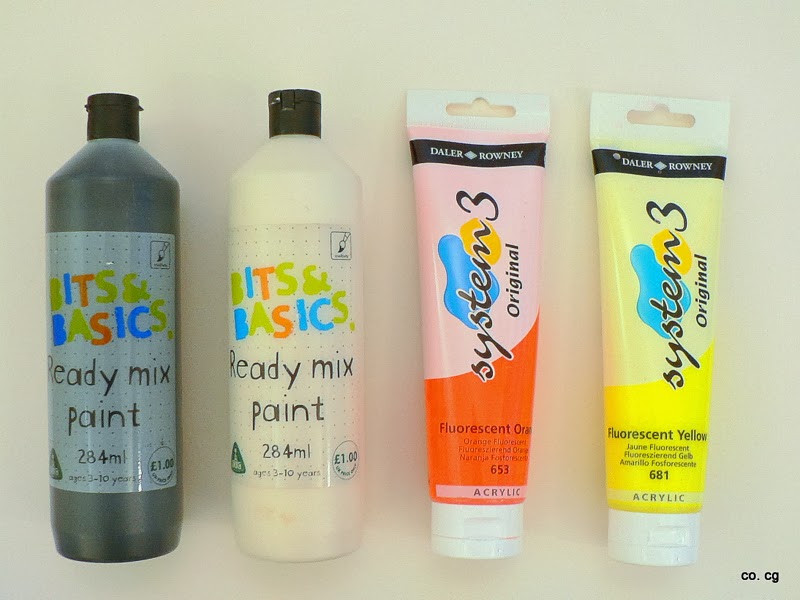
- 220 gsm Drawing Paper (strong surface for repeated working), a few A3 sheets
- Colours: black, white, NEON orange and NEON yellow
- Permanent Marker
- Cardboard for the stencil
- Pencil, rubber, scissor, set square or ruler
  1. At first you need to apply a white foundation to the backround paper. This gives it texture and adds depth  to the picture.
  1. While the white paint is drying, you need to figure out what colour palette you want to use for the triangles. I went for:
    • NEON orange pastel shades (NEON orange mixed with white)
    • NEON yellow pastel shades (NEON yellow mixed with white)
    • Grey (black mixed with white)
    • Black


  1. Then you have to paint different sheets of paper with the colour shades. 2-3 coats makes the paint opaque. I love to paint with a coarse bristle brush, which adds structure and leaves the bristle lines visible. 


  1. For the stencil, you need cardboard paper, a pencil and a set square. First, draw a 4cm x 4cm (about 1.5 x 1.5 inches) square. Then half the top line of the square. Join this point with the two edges that lie on the other side of the square. Voilà, the shape of a triangle. Cut it out and use it as a stencil to copy the shape on the rear of the painted paper. Now, you can cut out the triangles.


  1. A good tip is to use a black permanent marker to colour the cut edges of the black triangle. Later, when the black triangles are applied on the picture, it will make them look more plain and clean.


  1. Once you have a good pile of each colour, place them randomly on the picture. You can decide to have one colour slightly more than another in one area, but normally it's best not to be too conscious about your choices.


  1. Use the black triangles sparingly, as it is the most solid colour. Maybe 4 - 5 pieces are enough.


  1. Now you can glue the triangles to the picture. To finish, cut some of the triangle in half and glue them to the sides of the pattern to make the final impression of the picture square complete. While the picture is drying, I placed some heavy books on top of them, so that the triangles are glued flattened to the paper (the complete hardback edition of Lord of the Rings is always handy).


  1. Once dry and framed, enjoy finding a suitable spot in your home to hang your handiwork and enjoy :)


updated 20/09/13
Google Analytics Alternative